Saturday, April 13, 2013

$10 DIY Throw Ladder


What have I found to be the best part of being a home-owner?  Knowing that there is no rush to get projects done, because no matter how hard we work, there will always be another project waiting for us when we finish.  
Being a new homeowner, I've had SO many craft ideas running through my mind.  Unfortunately, other projects kept taking precedence and I was denying myself my therapy -- errr... craft time.  For 4 months, I had a laundry basket sitting in the corner of the room to store blankets and to "fill up space".  I was inspired by Pottery Barn decor (link here) to create a ladder to hold throw blankets. But was definitely not inspired by the pricetag of $179.
So how can you make one yourself for 5% of the cost?  You'll need the following supplies:

  • 2 - 2x2s ($2 each)
  • 2 - 1" dowel rods ($2 each)
  • Saw
  • Drill
  • Screws
  • Paint of your choice (I used a sample-sized wood stain for $3)
Step 1: Measure your dowel rods (mine was 48") and mark the rod at both 1/3 and 2/3 of the total length.
Step 2: Saw through dowel rods at marked areas.
Step 3: Paint dowel rods,  2x2s, and top of screws with paint of your choice.
Step 4: Measure total length of your 2x2s and divide by the amount of rungs you would like to use +1 
e.g. 78" in length/(5 rungs+1)=13"
Step 5: Line up your dowel rod perpendicular to the 2x2 the appropriate distance from the end of the 2x2 (e.g. 13").
Step 6: Using a drill-bit, drill through the 2x2 into the dowel rod (from the outside in).  Next, use the drill to place screws into the 2x2, holding the dowel in place.
Step 7: Repeat on all dowel rods, and again on the other 2x2, connecting all pieces of the ladder.
Step 8: Find a cute location and enjoy!

Sunday, September 16, 2012

Decorative Coin Letter

As we're getting ready to move soon, the only room I seem to have decorative ideas for is the pup's room.  Black & white pictures of Bauer and all of his doggie friends will surround the walls in his bedroom.  

Cute, right?

I found this picture on Pinterest and used it as motivation for this craft.  I tried covering the "B" in pennies but it had awkward spaces between coins and didn't look clean.  There are so many options for decorating letters with coins: filling, outlining, designs, etc.  I happen to love the copper color pennies provide but you can use dimes, nickels, or quarters if you prefer silver.  The different sizes of the coins allow you to have some flexibility with the shapes and sizes of the letters.  

The best part about this craft?  All you need is hot glue, coins, and a base letter!

Wednesday, September 12, 2012

Godfather's Dessert Pizza

Dessert pizza.  This stuff is gooood.  It was always a Sunday treat to go to Godfathers Pizza and eat as much dessert pizza as my 7 year old stomach could handle.  16 years later, I've got a larger stomach and my own oven... dangerous, right?


Ingredients:
Pizza Crust: I used store-bought refrigerated but if you're feeling adventurous, make your own!
1 1/2 tablespoon melted butter

Streusel Mix:
1/2 c. + 1/3 c. flour
1/4 c. brown sugar
1/3 c. sugar
2 tablespoons Crisco
2 tablespoons olive oil
1 tablespoon melted butter

Icing:
2 c. powdered sugar
2 tablespoon milk
1 teaspoon vanilla

Directions:
Spray pan with Pam.  Flatten dough to 10-12" , Preheat oven to 450'.  Spread melted butter across crust.  Sprinkle cinnamon on crust.
Mix all streusel ingredients together and evenly distribute on pizza crust.
Bake pizza at 450' for 6-8 minutes depending on the thickness of the crust.  Meanwhile, mix icing ingredients.
Once pizza dough is cooked through, remove from oven and top with icing.  Let cool, and enjoy!

Friday, June 15, 2012

Peanut Butter Fruit Dip

Yum.
This dip only requires 3 ingredients and 5 minutes.  Is that even possible?


Ingredients: (yields 5 servings)
1/2 c. Natural creamy peanut butter
1/2 c. Fruit flavored yogurt
1/4 c. Powdered sugar

Optional Ingredients:
1/2 t. vanilla extract
Sprinkles of cinnamon

So tasty it's hard to believe how easy the prep work is!  

Step 1: Measure out ingredients for dip.
Step 2: Mix all ingredients together in a medium mixing bowl.
Step 3: Prepare fruit tray and serve!  Some food that goes well with the dip - bananas, apples, strawberries, chocolate, graham crackers, etc.  Be creative - everything tastes better with peanut butter!

Please note: If you're serving more than 5 people, I would suggest making 2 servings.
Enjoy!

Thursday, April 12, 2012

No-Sew Ruffle Wreath

Of course I would find a way to make a ruffle wreath without sewing... but it was so easy and only cost me about $7!


Materials needed:

  • A 10"-14"Styrofoam wreath (I used flat edge since round wasn't available... either will work)
  • A hot glue gun
  • 1 yard Linen fabric
  • Decorative ribbon or fabric (optional)
  • Scissors

Step 1:  Cut 3 2"x1 yd strips of your linen.  Using hot glue, wrap tightly around your styrofoam wreath.  It doesn't need to be perfect since this area should be covered by the ruffles.  However, this step is necessary as the base of the wreath may show through under some ruffles.


Step 2:  Cut 20 2"x12" strips of linen (you may need more or less depending on the size of your wreath base (mine was 14").  


Step 3: On the back side of the wreath, place hot glue on the base fabric and attach one end of your 2"x12" fabric.


Step 4: Place a small strip of hot glue on your initial wreath base along the fabric line.  Pinch together the fabric before pressing into the hot glue, creating the ruffle effect.  Repeat this step, always placing the glue on the wreath base and overlapping the loose end of the linen over the last ruffle by about 1".  Optional:  If you want to add a little more decoration, use a different fabric pattern or wide ribbon repeating the same ruffle steps.


Step 5: Hang wreath from a ribbon and place on metal wreath hanger.  Voila - you're done!

Saturday, March 17, 2012

Raspberry Cinnamon French Toast

Fresh raspberries pretty much taste good with any breakfast meal... but this meal was just delicious!

Ingredients:
  • 12 slices cinnamon bread (we chose no raisins)
  • 5 eggs, beaten
  • 1-1/2 T Oil, for frying
  • 1-3/4 c milk
  • 1 c brown sugar
  • 1/4 t ground cinnamon
  • 1/4 t ground nutmeg
  • 1/2 t vanilla
  • 1/4 c butter, melted
  • Powdered sugar
  • 2 cups fresh raspberries
And from there you just follow your standard french toast instructions!
Step 1: In a medium mixing bowl, mix together eggs, milk, 3/4 c brown sugar, cinnamon, nutmeg, & vanilla.
Step 2: Warm oil in frying pan.
Step 3: Dip pieces of bread in egg mixture just long enough to soak both sides.
Step 4: Fry french toast until lightly browned on both sides.
Step 5: Drizzle with butter and remaining brown sugar 
Step 6: Top with fresh raspberries, powdered sugar, maple syrup, and enjoy!

Recipe adapted from Taste of Home

Sunday, March 11, 2012

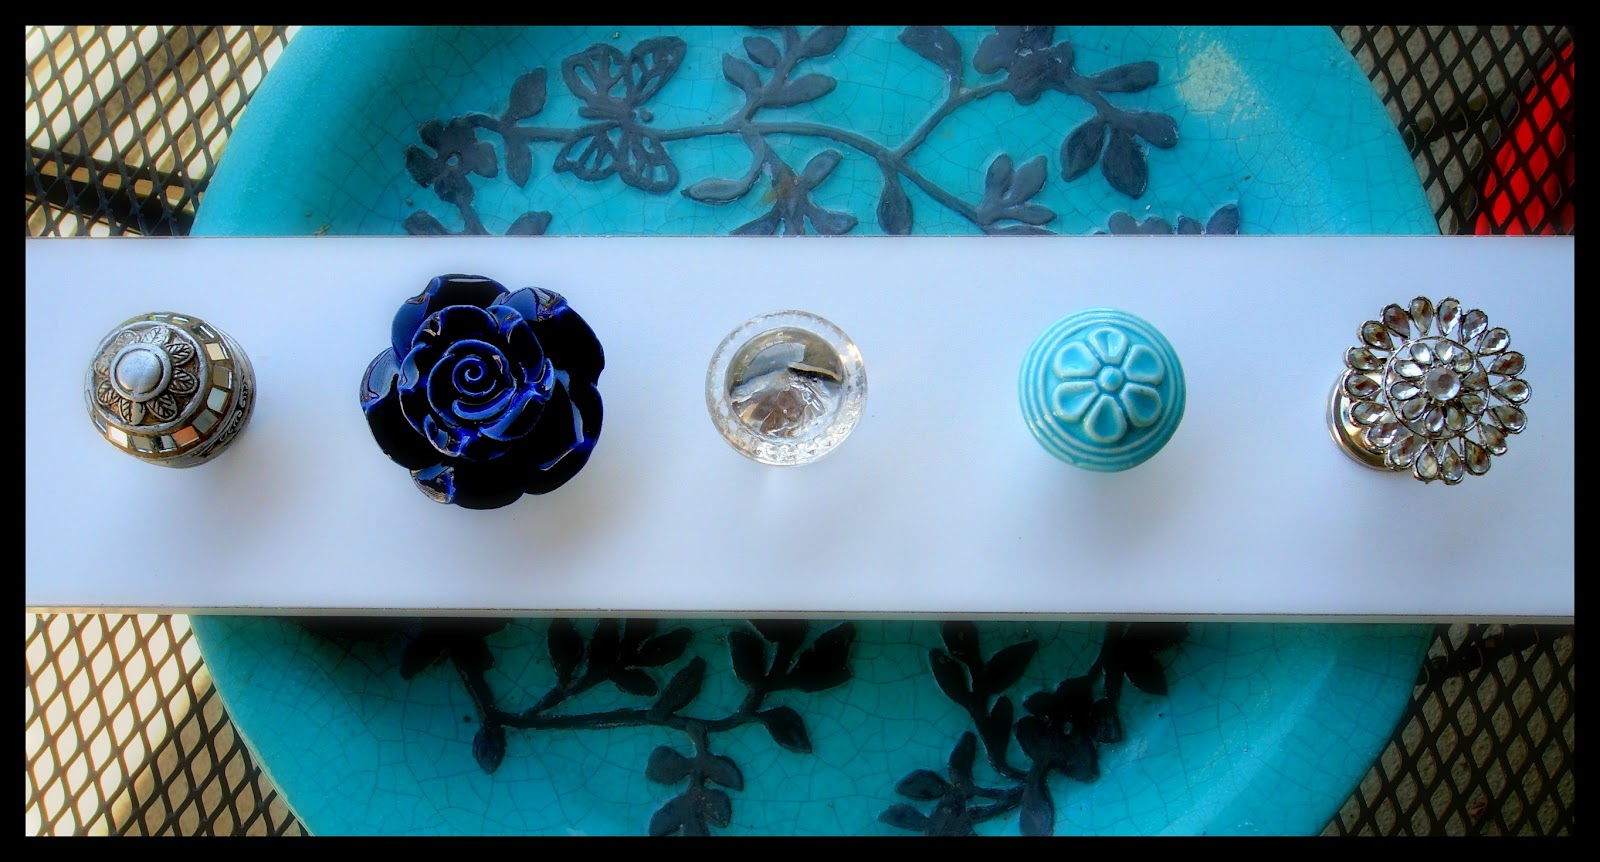
DIY Jewelry Holder


As my best friend's birthday approached, I had no idea what to get her... so I (of course) turned to Pinterest for an answer.  I scoped out things she pinned that I could possibly make and landed on this cute idea!  But rather than paying $35 + shipping, I thought I'd hit up the 50% off Hobby Lobby deals and make it a DIY project.


Supplies Needed:

  • Wood with sawtooth hooks on back (or you can add those on yourself)
  • 5 knobs (depending on length of wood)
  • Hacksaw
  • Drill & drill bits
Make sure you find knobs that compliment each other well and the more they "pop", the better :-)  Hobby Lobby had a huge selection of knobs!  

I must admit, this project is not for the faint of heart!  I had to seek out the assistance of my coworkers since I didn't have the necessary tools (and didn't want to drop $150 on a drill).  Luckily, I work with some perfectionists who did a great (dare I say perfect) job.

So once you have the materials, here's what you need to do...
Step 1:  Measure out the height of the wood
Step 2:  Using a pencil & a ruler/yardstick, draw a horizontal straight line across the center of wood (height divided in half)
Step 3:  Measure out the length of the wood
Step 4:  Divide the length by the number of knobs and mark a circle at each evenly spaced distance
Step 5:  Drill a hole just large enough for the bolt to go through at every circle
Step 6:  With the bolt all the way pushed through, use a permanent marker to mark the bolt where it hits the back side of the wood
Step 7:  Pull the bolts back out of the wood and use the hacksaw to cut at the marked area on the bolt
Step 8:  Drill an inset hole through the back of the wood deep enough for the nut to rest inside the wood
Step 9:  Place knobs through holes, screw the nuts onto the bolt
Step 10:  Admire your new jewelry hanger because you're done!